Posts

Showing posts from 2014

Android-5: Card and images with rounded corners in Android 4

Card and images with rounded corners in Android 4 As you know the CardView in support library has a different behaviour for API=21 and API &lt 21. If you would like to have an image (full or partial) inside your cardView with Rounded corners it is by default only in Android 5. This gist can be useful to achieve the same aspect also in Android V4 (and as always it can be improved) Here the link . The trick is to elaborate the image and obtain an image with rounded corners (I am using the snippet published by +Romain Guy) Pay attention: you have to use cardView.setPreventCornerOverlap(false) ; to avoid the internal padding in api&lt21.

Android-5 tip about the Toolbar and the Style

Toolbar style and theme. With the new Toolbar you can apply a style and a theme . They are different! The style is local to the Toolbar view, for example the background color. The app:theme is instead global to all ui elements inflated in the Toolbar, for example the color of the title and icons.

Android-L #gist4: a SimpleSectionedRecyclerView

Image
It is a SimpleSectionedRecyclerViewAdapter . It is the porting of the SimpleSectionedListAdapter[1] provided by Google with the #io code. It can be used to realize a simple sectioned list without changing your adapter. It works with a RecyclerView with a LinearLayoutManager and also work with the TwoWayView with the ListLayoutManager. Here the code : ps: the RecyclerView pattern is new... then this code can be improved (I am sure). [1]: Google Io14

Android-L gist#3 : Recycler View: Item Animations

Image
Here you can find a little collection of ItemAnimators for the RecyclerView . SlideInOutLeftItemAnimator : which applies a slide in/out from/to the left animation SlideInOutRightItemAnimator : which applies a slide in/out from/to the right animation SlideInOutTopItemAnimator : which applies a slide in/out from/to the top animation Github repo: https://github.com/gabrielemariotti/RecyclerViewItemAnimators

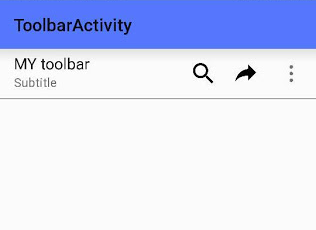
Android-L gist#2: A little gist for the new Toolbar

Image
Android-L introduced a new widget called Toolbar . The new Toolbar contains the following elements: A navigation button . This may be an Up arrow, navigation menu toggle, close, collapse, done or another glyph of the app's choosing. This button should always be used to access other navigational destinations within the container of the Toolbar and its signified content or otherwise leave the current context signified by the Toolbar. A branded logo image . This may extend to the height of the bar and can be arbitrarily wide. A title and subtitle . The title should be a signpost for the Toolbar's current position in the navigation hierarchy and the content contained there. The subtitle, if present should indicate any extended information about the current content. If an app uses a logo image it should strongly consider omitting a title and subtitle. One or more custom views . The application may add arbitrary child views to the Toolbar. They will appear at this position wit

Wear gist#4: How to use a simple a GridViewPager with a FragmentGridPagerAdapter

Image
It is very simple to use the FragmentGridPagerAdapter in your Android Wear App. You can build a new CardFragment with the default layout including title, text and icon using the method: CardFragment.create(page.mTitle, page.mText, page.mIconId) Also you can provide a background overriding the getBackground(int row, int col) method in your adapter. Very useful the class ImageReference which provides a reference to an image Here a small gist

Wear gist #3:how to start an Activity on the mobile handheld from the Android Wear device

You can start an Activity on the mobile handheld from your Wear device. In order to achieve it you have to: In your wear activity: connect the GoogleApiClient get the node [1] connected send the message with the Wearable.MessageApi.sendMessage [2] In your mobile app: register a WearableListenerService start the intent when the message is received Here a little (and improvable) gist: https://gist.github.com/gabrielemariotti/117b05aad4db251f7534 [1]: http://developer.android.com/reference/com/google/android/gms/wearable/NodeApi.html#getConnectedNodes(com.google.android.gms.common.api.GoogleApiClient) [2]: http://developer.android.com/reference/com/google/android/gms/wearable/MessageApi.html#sendMessage(com.google.android.gms.common.api.GoogleApiClient, java.lang.String, java.lang.String, byte[])

Wear gist#2: Battery details

Image
Here a little gist to get details from your battery in your wear device. https://gist.github.com/gabrielemariotti/b49cf077d184e8b26378

Wear gist#1: How to get the heart rate on the Samsung Gear Live.

Image
Here a little gist to get the heart rate on the Samsung Gear Live. https://gist.github.com/gabrielemariotti/d23bfe583e900a4f9276

Android-L gist#1 : Floating Action Button

Image
Here you can find a little gist to build a simple Floating Action Button with shadow, ripple and outline . Of course it requires Android-L preview. Link https://gist.github.com/gabrielemariotti/d1baf785c2444d29819c This code is built watching the #io14 videos, and mainly checking code at https://github.com/romainguy/google-io-2014 .

GPlayServices #1: Save to Google Drive

Image
A little snippet to save a file (or some contents) in Google Drive with the Drive API included in the Google Play Services . To use the Google Drive API we have to follow these steps:(this blog doesn't cover these topics) : Set Up Google Play Services SDK Register your app in Google Developers Console to activate the API Now we can build our code. First of all, we have to create an instance of GoogleApiClient using the GoogleApiClient.Builder and implementing the callback interfaces to manage the connection and the authorizations as described in GPlay Service #0 . Our scope is to save a file (an image) choosing a folder in Google Drive. To choose a folder inside our Google Drive we can use the Drive.DriveApi.newOpenFileActivityBuilder() . This method creates a builder for an Open File activity that allows user selection of a Drive file. Upon completion, the result Intent will contain the DriveId for the selected file. We can use the OnConnected interface to know

GPlayServices #0: Configure the GoogleApiClient with Google Play Services.

Image
A little snippet to connect your app with the Google Play Services API. To use the Google Play Services API you have to follow these steps:(this blog doesn't cover these topics) : Set Up Google Play Services SDK Register your app in Google Developers Console to activate the API Now you can build your code. First of all, create an instance of GoogleApiClient using the GoogleApiClient.Builder. /** * Called when activity gets visible. A connection to Drive services need to * be initiated as soon as the activity is visible. Registers * {@code ConnectionCallbacks} and {@code OnConnectionFailedListener} on the * activities itself. */ @Override protected void onResume() { super.onResume(); if (mGoogleApiClient == null) { mGoogleApiClient = new GoogleApiClient.Builder(this) .addApi(Drive.API) .addScope(Drive.SCOPE_FILE) .addScope(Drive.SCOPE_APPFOLDER)

Integrating an Android Github repo with Travis Ci with the new Android Plugin

In my previous post I wrote how to integrate an Android Github repo with Travis Ci. Now we can change something in our travis.yml , using the new Android plugin . Warning:The features described here are still in development! All the considerations described in the old post remain valid, but we can update some parts. First, declare the new language : language: android With this line, travis provides the Android SDK 22.6.2 with following preinstalled components : platform-tools android-19 sysimg-19 (ARM) android-18 sysimg-18 (ARM) android-17 sysimg-17 (ARM) android-16 sysimg-16 (ARM) android-15 sysimg-15 (ARM) android-10 extra-android-support extra-google-google_play_services extra-google-m2repository extra-android-m2repository Here you can find the updated list . Then we can add or update (a.k.a. re-install) some components to get the latest minor versions: android: components: - build-tools-19.0.3 Under the wood the plugin runs the command: androi

Integrating an Android Github repo with Travis Ci

I have spent a bit of time to integrate my github repos with Travis CI . Travis is a hosted continuous integration service for the open source community and it is very popular, but I saw very few open-source Android projects which are using Travis. The main reason is that Travis CI's build environment provides different runtimes for different languages but it is not pre-configured with Android SDK, build tools, therefore it requires some knowledge. First of all, I am not an expert! The first steps to integrate travis with Github are very easy. 1. Sign in with your GitHub account and authorize Travis. Here you can find more detail about permissions . 2. Activate your projects in your profile page Then the real focal point: 3. Add .travis.yml to the root of your repository . In order for Travis CI to build your project, you need to tell the system a little bit about it. First, declare language . It tells Travis CI which language environment to select for your projec

Snippet: align a TextView around an image

Image
A few weeks ago I discovered the Spans on Android,after reading the wonderful post by Flavien Laurent . In this post I will describe how to realize a particular layout not very common on Android: a text around an image. This layout is not an Android Pattern, but it can be useful in same cases. As always it is just an example, and you should improve some points in your real project. Use a simple layout: To achieve our scope, we can use a LeadingMarginSpan.LeadingMarginSpan2 . This span allows the implementor to specify the number of lines of text to which this object is attached that the "first line of paragraph" margin width will be applied to. /** * */ class MyLeadingMarginSpan2 implements LeadingMarginSpan.LeadingMarginSpan2 { private int margin; private int lines; MyLeadingMarginSpan2(int lines, int margin) { this.margin = margin; th

A way to evaluate an Android open source library

This last year, I have had opportunity to learn many things about open source libraries. Working on my small library (thanks to everybody for the support and help!) I could see some aspects on the other side. Before using a library, you should check some points. License It is a very focal point! The first thing to look at is the what license the code has been released. Open source doesn't mean that you can use the code in any context. There are various types of licenses and you should check if the license is compatible with your project otherwise you can have legal issues. Maintenance Check the last commits in the repository. If the last commit was 1 year ago likely the project has been abandoned (or it is complete and doesn't require updates...). Also it is very important to check how often the project is updated (or was updated). Do not underestimate this point. If you use a library which is no longer maintained, you could have problems in the future. Branch

Drawing shapes with fingers

Image
It is very simple to draw basic shapes with fingers. As always, it is just an example, you can improve it in many ways. First of all we need a custom View . public class DrawingView extends View { } Then we will use a Bitmap, a Canvas and a Paint ojbects: protected Paint mPaint; protected Bitmap mBitmap; protected Canvas mCanvas; To initialize the bitmap and the canvas, we can override this method in our View: @Override protected void onSizeChanged(int w, int h, int oldw, int oldh) { super.onSizeChanged(w, h, oldw, oldh); mBitmap = Bitmap.createBitmap(w, h, Bitmap.Config.ARGB_8888); mCanvas = new Canvas(mBitmap); } If you need to create a new Canvas, you must define the Bitmap upon which drawing will actually be performed. The Bitmap is always required for a Canvas. Then we can define the paint object. The Paint holds the information about the style and the color which we will use to draw. For example: public