Posts

Showing posts from January, 2013

PreferenceActivity , PreferenceFragment and headers (Part 2)
Image
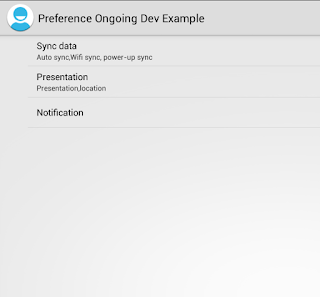
In previous post we described how to use Preference Activity and Preference Fragment. Android 3.0 (API Level 11) introduced Preference Headers through which we can show the user the list of headers, and upon clicking on a header, show the fragment. A great benefit to using this design is that PreferenceActivity automatically presents the two-pane layout when running on large screens. This behavior is particularly useful if you have more than 10 preferences, otherwise I suggest the direction of displaying headers all of the time. Scenario 3: Preference Headers   Step 1: Define the preferences_headers_scenario3.xml This file lists each settings group and declares which fragment contains the corresponding list of settings.The file is placed in the res\xml folder. With the android:fragment attribute, each header declares an instance of PreferenceFragment that should open when the user selects the header. Step 2: Create the Preference Activity To d

PreferenceActivity , PreferenceFragment and headers (Part 1)

Image
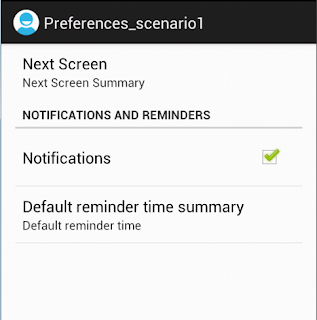
In this tutorial we will build a preference screen in different ways. Android provides a powerful xml driven framework to manage user preferences, that allows us to easily create preference screens such as those in Android itself and it automatically generates UI for that.  All we need to do is to simply use it in our app . See these  pages for more information on PreferenceActivity .and PreferenceFragment . We will evaluate 4 scenarios: Scenario 1: PreferenceActivity Scenario 2: PreferenceFragment Scenario 3: Preference Headers Scenario 4: PreferenceFragment and Headers with older versions Scenario 1: PreferenceActivity   In this scenario we will use a very simple but common example. Define the preferences_scenario1.xml The Preferences Activity screen is defined in the  preferences_scenario1.xm l file as shown below. This file is placed in the  res\xml  folder

Android Logging

This post describes how to create log statements in Android applications. Android uses the android.util.Log class for logging. This class supports various levels (VERBOSE, DEBUG, INFO, WARN, ERROR) and contains numerous methods to print debugging information to the logcat utility. Logcat is visible in the debug perspective in Eclipse or by running adb logcat on the command line. You can read more about it here . Log.w("MyTag", "Mymessage"); This code will output a warning with the tag MyTag and the message "Mymessage". The first parameter of these method is the category and the second is the message. Usually you use this code: public static final String TAG = "it.gmariotti.android.apps.Myapp"; log.w(TAG,"MyMessage"); It is very important to turn down logging when you deploy your app to the market. Google advises that a deployed application should not contain logging code. We can find a very good example in Google I/O 2012 a

How use Prettify in new Blogger Dynamic Views

I've started to use Blogger. First thing I've wanted to use in my posts a SyntaxHighlighter. I've chosen google-code-prettify . It is easy to setup, Google uses it, and it works very well. You can find instructions here . Go to the blogger dashboard, then click Template link present on the left-hand-side list click on Edit HTML button. Edit HTML dialog box will appear. Put the following tags in <head> tag section of HTML template. <link   href = "http://google-code-prettify.googlecode.com/svn/trunk/src/prettify.css"   type = "text/css"   rel = "stylesheet" /> <script type = "text/javascript"   src = "http://google-code-prettify.googlecode.com/svn/trunk/src/prettify.js" > </script> Edit the <body> tag and it should look like as shown below. <body onload = " prettyPrint () " ... > Once you are done, just save the

A new blog

Hello, this is my new blog about Android development. Topics center around problems that I stumbled upon and solutions that I found helpful.