Posts

Showing posts from 2013

Restricted Profiles Settings

Image
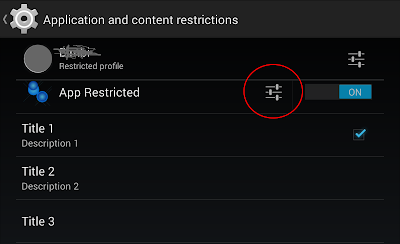
Yesterday Netflix for Android introduced the Restricted Profiles feature. It is a very powerful opportunity, but very few apps are using this feature. Remember that restricted profiles require API 18. Let's see how to realize it. It is very simple. First of all, we need to use a BroadcastReceiver that receives the ACTION_GET_RESTRICTION_ENTRIES intent. When we click on the setting icon, our BroadcastReceiver is called. Our receiver has a EXTRA_RESTRICTIONS_INTENT Bundle which contains the key-value pairs for each restriction. @Override public void onReceive(final Context context, Intent intent) { final Bundle currentRestrictions = intent.getBundleExtra(Intent.EXTRA_RESTRICTIONS_BUNDLE); In onReceive() method you have to create a RestrictionEntry for each restriction your app provides. Each RestrictionEntry defines a restriction title, description, and one of the following data types: TYPE_BOOLEAN TY

Some thoughts about AppOpsManager and 4.4

Image
Android 4.3 introduced a new hidden feature: AppOps. Android 4.4 improved this feature, but it is still hidden. Someone talks about it as an "App Permission Manager". We have very few information about it, but it is a lot more than a simple permission manager. Currently there is no action to launch it. You can see it in Manifest.xml: https://github.com/android/platform_packages_apps_settings/blob/master/AndroidManifest.xml#L802 A simple way could be this: Intent intent = new Intent("android.settings.SETTINGS"); intent.putExtra(PreferenceActivity.EXTRA_SHOW_FRAGMENT, "com.android.settings.applications.AppOpsSummary"); startActivity(intent); Here you can find info about apps which use location-permissions, contact-permissions, message-permissions.... In the list, for each app you can see the last use of this permission, and if you click on an item, you can see a full detail. Pay attention! You can disable permi

NotificationListenerService and kitkat

Image
Android 4.3 (API 18) introduced NotificationListenerService . I published a post about it a few months ago. Android 4.4 (API 19) added new features, and now we can have a lot of extra info about a notification (before we need to use reflection to read some info). As in 4.3,to use the NotificationListenerService we have to extend the NotificationListenerService and implement onNotificationPosted() and onNotificationRemoved() methods public class SimpleKitkatNotificationListener extends NotificationListenerService { @Override public void onNotificationPosted(StatusBarNotification sbn) { //.............. } @Override public void onNotificationRemoved(StatusBarNotification sbn) { //.............. } } Then we must declare the service in the manifest file with the BIND_NOTIFICATION_LISTENER_SERVICE permission and include an intent filter with the SERVICE_INTERFACE action

Common tips about Gradle - part 2

In my previous post I wrote some common gradle tips. In this post I will continue to collect other common (and basic) cases. I would like to use the Eclipse folders structure in Android Studio. How to achieve that? In your build.gradle you can set this script: android { sourceSets { main { manifest.srcFile 'AndroidManifest.xml' java.srcDirs = ['src'] resources.srcDirs = ['src'] aidl.srcDirs = ['src'] renderscript.srcDirs = ['src'] res.srcDirs = ['res'] assets.srcDirs = ['assets'] } } } Where should I create the libs folder for my jars file? You can use this structure: - root - project libs myjar.jar src main java res build.gradle In build.gradle: dependencies { compile files('libs/myjar.jar') } Where should I create the aidl

Common tips about Gradle

Image
If you are using Gradle , you already know many of these tips. In the last days many devs (they are using Eclipse) asked me some questions about Gradle. I will not talk about what is Gradle, because you can find very good tutorial about it. I will collect some common (and basic) cases. First of all, if you are looking for a good tutorial, I suggest you these links: Official Guide Mark Allison's series Android Studio IDE helps you to manage Gradle files, but I suggest you understand what are the gradle files, so you can easily edit them manually. I've just created a new project It is important to understand the gradle structure. - root - myProject build.gradle setting.gradle build.gradle At the root project you will find 2 files: settings.gradle build.gradle settings.gradle tells Gradle at build time that there are sub-projects to build. Here an example: include ':myPproject' build.gradle defines how to build the project/module.

How to export a View as Bitmap

Image
In last days in my Card library , I tried to export a View as a Bitmap. A simple way to export the view is to use following code: Bitmap bitmap = Bitmap.createBitmap(view.getWidth(), view.getHeight(), Bitmap.Config.ARGB_8888); Canvas canvas = new Canvas(bitmap); view.draw(canvas); Pay attention where you will use this code . If you use this in onCreate() method, the View didn't go through a layout, so its size is null (0x0). In these cases you have to use something like this before drawing the bitmap: view.measure(widthSpec, heightSpec); view.layout(left, top, right, bottom); An example: int spec = MeasureSpec.makeMeasureSpec(0,MeasureSpec.UNSPECIFIED); view.measure(spec,spec); view.layout(0, 0, view.getMeasuredWidth(), view.getMeasuredHeight()); Bitmap b = Bitmap.createBitmap(view.getWidth(), view.getHeight(), Bitmap.Config.ARGB_8888); Canvas canva

Publish an aar file to Maven Central with Gradle

Image
In the last days I tried to publish ChangeLog Lib as aar (Android Archive) to Maven Central . First of all, I am a newbie in Gradle and Maven.I always used repo as a final user, so there could be better solutions. My first step was to find an approved repository . I decided to use the Sonatype OSS Repository , which is an approved repository provided by Sonatype. 1. Register your project at Sonatype It is easy. You can use the official guide . You have to follow the 2nd and 3th section. In this way you can create your user, and your project. When you create your project, pay attention to groupId . It is very important. Here you can find a some tips about it. If you don't own a domain, you can choose a groupId that reflects your project hosting, something like com.github.gabrielemariotti. You can't use it immediately; Sonatype have to prepare repo and normally it takes 1-2 business days. Then you can write your gradle scripts to upload aar file. 2. Grad

A Card Library

Image
In the last weeks I tried to collect my code and build a Card library. I wanted something that could realize many types of Card (not all, of course), with some built-in features without having to rewrite each time a lot of code. I am still developing but a first version is presentable Card Library provides a custom tag CardView to display a UI Card. It provides different parts as a Header, a Thumbnail, a Shadow, a MainContentArea where you can inflate your custom layout You can customize the global layout as you like You can have some built-in features as OnClickListener, OnSwipeListener , OnLongClickListener CardHeader` provides an overflow button with a PopupMenuListener, a button to expand/collapse an area, or a customizable button with its listener. CardThumbnail` load a Bitmap with a resource ID or with a URL using `LRUCache` and an `AsyncTask` Create a `Card` is is pretty simple. First, you need an XML layout that will display the `Card`. Th

Expand and collapse animation

Image
If you search a simple code to expand and collpse a View with an animation you'll find a lot of example. Almost all of the examples extend Animation class. Instead I would like to use an Animator and its listeners. Where I come from they say I'm discovering the hot water. I know, but it might be useful to someone. Here you can see a short video: The code is very simple: We'll use two LinearLayout . .... ..... ..... In our Activity we simply add a OnClickListener to our Header View. public class MainActivity extends Activity { LinearLayout mLinearLayout; LinearLayout mLinearLayoutHeader; @Override protected void onCreate(Bundle savedInstanceState) { super.onCreate(savedInstanceState); setContentView(R.layout.activity_main); mLinearLayout = (LinearLayout) findViewById(R.id.expandable); //set visibility to GONE mLinearLayout.setVisibili

An android library to display your changelog

Image
I've published a small library to display your changelog. You can find sources, docs and examples in github . ChangeLog Library provides an easy way to display a change log in your Android app. It provides a custom ListView to display a change log through a xml file. it supports multi language you can use it in Activities, Fragments, Dialogs it supports html text markup as bold and italics you can customize layout and behaviour Implementing this library in your own apps is pretty simple. First, you need an XML layout that will contain the ChangeLogListView that displays your changelog. Then, you need a XML file with change log in res/raw folder . It automatically searches for res/raw/changelog.xml but you can customize filename. Initial release. [b]New![/b] Add new attrs to customize header and row layout Fixed log while parsing Add support for html markup Add bulle

Color Pickers from Google

Image
There are a lot of Color Pickers available, some very nice. The most difficult thing is to know that there are and where they are. Here a first collection, written by Google. Checkout in github repository last version and last document about usage. Google Stock Calendar You can find source in Color Picker repository . You can download and use it It is very simple to use. You have just to provide an array of colors. ColorPickerDialog colorcalendar = ColorPickerDialog.newInstance( R.string.color_picker_default_title, mColor, 0, 5, Utils.isTablet(this)? ColorPickerDialog.SIZE_LARGE : ColorPickerDialog.SIZE_SMALL); colorcalendar.show(getFragmentManager(),"cal"); mColor is an array of Color. public static int[] colorChoice(Context context){ int[] mColorChoices=null; String[] color_array = context.getResources(). getStringArray(R.array.default_color_choice_values); if (color_array!=null &&

Notification History in 4.3+

Image
Android 4.3 has a new hidden feature: Notification History . Currently there is no action. You can see it in Manifest.xml: https://github.com/android/platform_packages_apps_settings/blob/master/AndroidManifest.xml#L785 A simple way could be this: Intent intent = new Intent("android.settings.SETTINGS"); intent.putExtra(PreferenceActivity.EXTRA_SHOW_FRAGMENT, "com.android.settings.NotificationStation" ); Otherwise you can use: Widgets->Setting shortcuts->Notifications and put a shortcut in your home launcher.

NotificationListenerService and a Whatsapp extension for Dashclock

Image
Android 4.3 (API 18) introduced NotificationListenerService . In this post I'll talk how to use this API, and I'll show how an app can observe the stream of notifications with the user's permission. It is very easy to use a NotificationListenerService. First of all you have to extend NotificationListenerService and implement onNotificationPosted() and onNotificationRemoved() methods public class WhtsNotificationListener extends NotificationListenerService { @Override public void onNotificationPosted(StatusBarNotification sbn) { //.............. } @Override public void onNotificationRemoved(StatusBarNotification sbn) { //.............. } } Then you must declare the service in your manifest file with the BIND_NOTIFICATION_LISTENER_SERVICE permission and include an intent filter with the SERVICE_INTERFACE action Finally user must enable your service. Without t

ActionBarCompat and NavigationDrawer

Image
In previous posts I talked about new ActionBarCompat . ActionBarSherlock vs ActionBarCompat How to add ActionBarCompat to your project In this post we'll try to use ActionBarCompat with the NavigationDrawer . If you have already implemented a NavigationDrawer with ActionBar, it is very easy to migrate to ActionBarCompat. I will use code I wrote with post Creating a Navigation Drawer . Here you can see steps: First of all you have to add ActionBarCompat to your project. Then: In your Activity you have to extend ActionBarActivity . Change getActionBar() with get getSupportActionBar() . Pay attention with invalidateOptionsMenu() . You have to change it with supportInvalidateOptionsMenu(); It is very easy! Some last tips: Be careful not to use attributes that work only with API 14+ , like ?android:attr/listPreferredItemHeightSmall or ?android:attr/textAppearanceListItemSmall . In this case you can use different styles using folder values-v14. Be careful w

How to add ActionBarCompat to your project.

Image
In my previous post I've talked about a comparison between ActionBarSherlock and ActionBarCompat. In this post we'll try to add ActionBarCompat to our project . It is pretty simple to use and implement ActionBarCompat, but we have to pay attention when we add it to our project. In Android Studio it is very very simple. Open build.gradle and add this: dependencies { compile 'com.android.support:appcompat-v7:18.0.+' } In ADT (Eclipse) you can add it as a library project based on code that you can find in sdk\extras\android\support\v7\appcompat . It is described here . Pay attention. In your project you have to add this library project. Now it is very simple to review our code. In Activity we have to extend ActionBarActivity . If you see source code it extends a FragmentActivity . import android.support.v4.view.MenuItemCompat; import android.support.v7.app.ActionBarActivity; import android.support.v7.widget.SearchView; import android.support.v7