Posts

Showing posts from February, 2013

Antipattern: freezing the UI with an AsyncTask

Image
The worst thing that can happen to your app's responsiveness is an "Application Not Responding" (ANR) dialog. In my previous post I described how to freeze the UI with a Broadcast Receiver. It is very important to understand which methods run in Main UI Thread. In this post we can find an example OF WHAT NOT TO DO WITH AN ASYNCTASK . We use an AsyncTask to execute background tasks in order to avoid the UI to become unresponsive, but not all methods run on the background thread. In our AsyncTask class we must override doInBackground() which is invoked on the background thread. There are three other optional methods each of which is invoked from the UI thread : onPreExecute – this is called before doInBackground() onProgressUpdate – this is called while doInBackground() is executing onPostExecute – this is called after doInBackground() If your app ties up the UI thread for more than 5 seconds, Android will throw up the Application Not Responding (AN

How to write a DashClock Extension: Whatsapp Extension example

Image
After BatteryExtension and DialExtension , now I tried to write an unofficial Whatsapp Extension for DashClock . It was not so easy... WhatsApp does not expose an API or official ContentProvider and therefore the only idea I had was to listen for status bar notifications. It requires you to enable a Accessibility Service to work. I don't like this way, because it needs relatively deep/dangerous permission authorizations. At present, I would't install an application that requires this type of authorization. With these permissions, an app can listen for all notification from all apps... You can specify which packages you want to listen to and only listen to those package, but users don't have visibility of this information . It would be a good idea if in the next version of Android this information was available. You can listen for status bar notifications by using AccessibilityEvent.TYPE_NOTIFICATION_STATE_CHANGED . We are going to write our WhtNotificati

AntiPattern: freezing a UI with Broadcast Receiver

Image
The worst thing that can happen to your app's responsiveness is an "Application Not Responding" (ANR) dialog. In android guidelines we can read: In any situation in which your app performs a potentially lengthy operation, you should not perform the work on the UI thread , but instead create a worker thread and do most of the work there. This keeps the UI thread (which drives the user interface event loop) running and prevents the system from concluding that your code has frozen. It's very important to understand what is Main Thread . When an Android app is launched, the system creates a thread for the application which is known as the main thread. If you run up any project under the debugger in Eclipse you will see the main thread. If your app ties up the UI thread for more than 5 seconds or a BroadcastReceiver does not complete within 10 seconds, Android will throw up the Application Not Responding (ANR) dialog which gives the user the opportunity t

How to write a DashClock Extension: Dial Extension example

Image
You can find here a new DashClock Extension example. In previous post I wrote a Battery Extension . This time I tried to make a Dial Extension . We are going to write our service DialExtension that extends the DashClockExtension class. public class DialExtension extends DashClockExtension { private static final String TAG = "DialExtension"; public static final String PREF_FAVORITE_CONTACT = "pref_dial_contact"; // Prefs protected Contact prefContact = null; @Override protected void onUpdateData(int reason) { //Read Preferences readPreferences(); //publish publishUpdateExtensionData(); } /** * publish Update data */ private void publishUpdateExtensionData() { if (prefContact!=null){ //Intent Intent dialIntent = new Intent (Intent.ACTION_DIAL, Uri.parse(prefContact.getPhoneNumber())); // Publish the extension data update. publishUpdate(new ExtensionData() .visible(

Making your application’s data usage preferences available from system settings

Image
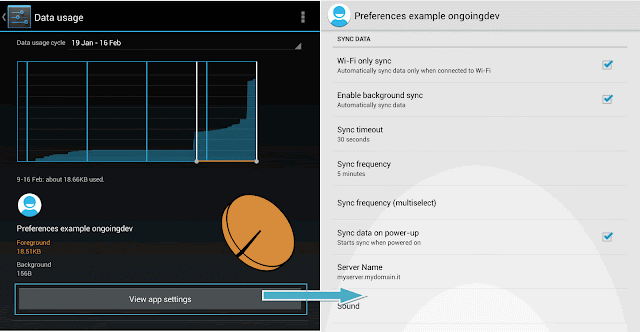
Android 4.0+ gives users the ability to monitor the amount of mobile data being used on their device, and in some cases, automatically turn off mobile data. You can access the Data Usage settings screen by opening the Settings app, and then selecting Data Usage. In Android 4.0+ if you create a Preference Activity to allow users to modify your application’s data usage, you can make it available from within the system settings when a user inspects your application’s data usage. It is very simple: just add a MANAGE_NETWORK_USAGE Intent Filter to the Preference Activity’s manifest node: Once set, the View Application Settings button in the system settings will launch your Preference Activity, allowing users to refine your application’s data usage rather than restricting or disabling it.

How to write a DashClock Extension: Battery Extension example

Image
With DashClock API it is very easy to write a DashClock Extension. UPDATE 27/05/2013--------------------------------------------------- . You can find it in Google Play. In this github repository you can find a full version. ------------------------------------------------------------------------------ . Here you can find a very simple Battery Extension . This is just an example (bit raw) that should be improved !! . We are going to write our service BatteryExtension that extends the DashClockExtension class. public class BatteryExtension extends DashClockExtension { private static final String TAG = "BatteryExtension"; @Override protected void onUpdateData(int reason) { IntentFilter ifilter = new IntentFilter(Intent.ACTION_BATTERY_CHANGED); Intent batteryStatus = getApplicationContext().registerReceiver(null, ifilter); // Level int level = batteryStatus.getIntExtra(BatteryManager.EXTRA_LEVEL, -1); //health //int health = battery

Learning from DashClock: How to display information about your next calendar appointment

Image
DashClock is lock screen clock widget for Android 4.2+. It is an awesome code example, from which we can learn and take snippets. Do you want to know how to display information about your next calendar appointment ? CalendarExtension is good answer. First of all we can access the data by making use of the CalendarContract content provider. Find next single occurrences of an event in next few hours Format information and that's all It's very important to note that these API works only with Android 4.0+. With this code we are going to query CalendarContract instances long now = getCurrentTimestamp(); Cursor cursor= getContentResolver().query( CalendarContract.Instances.CONTENT_URI.buildUpon() .appendPath(Long.toString(now)) .appendPath(Long.toString(now + DEFAULT_LOOK_AHEAD_HOURS * HOUR_MILLIS)) .build(), EventsQuery.PROJECTION, CalendarContract.Instances.ALL_DAY + "=0 AND " + CalendarContract.Instances.SELF_AT

App Install Location

Image
Have you ever seen error saying "Application cannot be installed in the default install location" when trying to update apps? Many devs have nexus devices, and they haven't sd card. Move to SD card is the feature which is introduced in Android 2.2. (API Level: 8). Add android:installLocation attribute to manifest tag as follows: .... The attribute android:installLocation can have following possible values. internalOnly : The application must be installed on the internal device storage only. If this is set, the application will never be installed on the external storage. If the internal storage is full, then the system will not install the application. This is also the default behavior if you do not define android:installLocation. auto : The application may be installed on the external storage, but the system will install the application on the internal storage by default. If the internal storage is full, then the system will install it on t

Preference Summary or Secondary Text

Image
In android settings guidelines we can read : Secondary text below is for status, not description… Before Ice Cream Sandwich, we often displayed secondary text below a label to further describe it or provide instructions. Starting in Ice Cream Sandwich, we're using secondary text for status,unless it's a checkbox setting. Unfortunately, at time of writitng, there doesn't seem to be a simple, automated way of doing this. In this post we are going to look at how to achieve it. We can get an example from AdvancedPreferences.java in the Android code samples (API Demos). Step 1: Create a class called MyPreferenceFragment This class extends PreferenceFragment and implements onSharedPreferenceChangeListener as shown below. public class MyPreferenceFragment extends PreferenceFragment implements OnSharedPreferenceChangeListener{ @Override public void onCreate(Bundle savedInstanceState) { super.onCreate(savedInstanceState);

PreferenceActivity , PreferenceFragment and headers (Part 3)

Image
In previous posts we described how to use Preference Activity,Preference Fragment and Preference Header. Part 1:Preference Fragment Part 2:Preference Header As we have seen, the example described in Scenario 3 doesn't work on older device (API Level<11). The Preference Fragment and associated Preference Headers are not supported on Android platforms prior to Android 3.0 (API level 11). As a result, if you want to create applications with headers that support devices running on both pre- and post-Honeycomb devices you have same alternatives: you need to create an additional preferences XML file that uses basic elements that behave like the header items you need to implement separate Preference Activities to support both, and launch the appropriate Activity at run time PreferenceFragment and Headers with older versions   As the first alternative: Step 1: Define the preferences_headers_scenario3.xml We can use the same file used in scenario3. This file lists each

Quick Snippet:Retrieve info from Manifest.xml

Image
The class PackageInfo exposes all the information contained within the Manifest.xml . We can easily get package name, version name,version code, last update time, permissions, services... try { PackageInfo mInfo = getPackageManager(). getPackageInfo(getPackageName(),PackageManager.GET_META_DATA); Log.i("packageInfo", "PackageName = " + mInfo.packageName); Log.i("packageInfo", "VersionName = " + mInfo.versionName); Log.i("packageInfo", "VersionCode = " + mInfo.versionCode); Log.i("packageInfo", "Last Update Time = " + new Date(mInfo.lastUpdateTime)); Log.i("packageInfo", "Permission = " + mInfo.permissions); } catch (NameNotFoundException e) { ...... }