A First Glance at Stetho tool
I decided to spend a few hours on Stetho.
Stetho is a sophisticated debug bridge for Android applications.
How to enable it
It is very simple to enable Stetho.
Just add these lines to your
Now the last step: Run the application and just open Chrome on your pc (where the device is plugged).
In your chrome just navigate on chrome://inspect

As you can see in the image you can see 2 apps running in my device (I love Nexus4 for this kind of tests....)
Here you can open a magical world...clicking the inspect link.
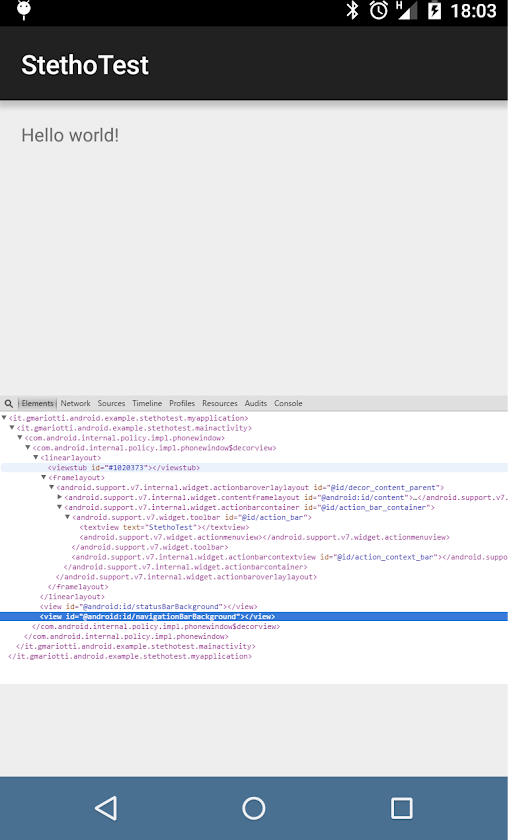
First of all you can see the elements tab.

Here you can navigate in the elements inside your Activity......
Here a first surprise...clicking on the entry on the tab, the element is highlighted on the device !
The network tab.
If you work with the Chrome Developer Tools, you know it very well. Here you can see the network calls with their data.
In my app I do a simple call with okhttp

The Resources tab.
In my sample app I am setting a simple value in the SharedPreferences.

Also I use a simple SQLiteOpenHelper to manage a very small database with just a table.

And you can run queries on your db...(!)

Of course it is only a first glance at this tool but it is enough to check the power of this debug tool.
You can get code from GitHub:
Stetho is a sophisticated debug bridge for Android applications.
How to enable it
It is very simple to enable Stetho.
Just add these lines to your
build.gradle:
Then in your Application you can enable the tool just adding:dependencies { // Stetho core compile 'com.facebook.stetho:stetho:1.1.1' //If you want to add a network helper compile 'com.facebook.stetho:stetho-okhttp:1.1.1' }
Stetho.initialize(
                    Stetho.newInitializerBuilder(this)
                            .enableDumpapp(
                                    Stetho.defaultDumperPluginsProvider(this))
                            .enableWebKitInspector(
                                    Stetho.defaultInspectorModulesProvider(this))
                            .build());
In my simple application, I have a network call with okhttp-client , a simple value in the shared preferences, and a small db with one table.Now the last step: Run the application and just open Chrome on your pc (where the device is plugged).
In your chrome just navigate on chrome://inspect

As you can see in the image you can see 2 apps running in my device (I love Nexus4 for this kind of tests....)
- Chrome
- My Stetho Test App
Here you can open a magical world...clicking the inspect link.
First of all you can see the elements tab.

Here you can navigate in the elements inside your Activity......
Here a first surprise...clicking on the entry on the tab, the element is highlighted on the device !

The network tab.
If you work with the Chrome Developer Tools, you know it very well. Here you can see the network calls with their data.
In my app I do a simple call with okhttp
  OkHttpClient client = new OkHttpClient();
        client.networkInterceptors().add(new StethoInterceptor());

        Request request = new Request.Builder()
                .url("https://google.com")
                .build();

        client.newCall(request).enqueue(new Callback() {
            @Override
            public void onFailure(Request request, IOException e) {
                //do something
            }

            @Override
            public void onResponse(Response response) throws IOException {
                //do something
            }
        });
Here the tab:
The Resources tab.
In my sample app I am setting a simple value in the SharedPreferences.
 SharedPreferences.Editor editor = getSharedPreferences("TEST", MODE_PRIVATE).edit();
        editor.putString("name", "Paolo");
        editor.putInt("idName", 12);
        editor.commit();
You can check this value in the navigating in the Local Storage entry.
Also I use a simple SQLiteOpenHelper to manage a very small database with just a table.
private static final String CREATE_DATABASE = "CREATE TABLE " + TBL_USR + " ( " +
            TBL_USR_CLMN_ID + " INTEGER PRIMARY KEY AUTOINCREMENT NOT NULL, " +
            TBL_USR_CLMN_NAME + " TEXT NOT NULL, " +
            TBL_USR_CLMN_SURNAME + " TEXT NOT NULL, " +
            TBL_USR_CLMN_CODE + " INTEGER NOT NULL DEFAULT 0 " +
            ")";

@Override
    public void onCreate(SQLiteDatabase db) {

        db.execSQL(CREATE_DATABASE);
        db.execSQL("INSERT INTO " + TBL_USR + " " + "("+ TBL_USR_CLMN_NAME  +" , " + TBL_USR_CLMN_SURNAME +" , " + TBL_USR_CLMN_CODE  +")" + "  VALUES('PAOLO1','ROSSI1', 233432 )");
        db.execSQL("INSERT INTO " + TBL_USR + " " + "("+ TBL_USR_CLMN_NAME  +" , " + TBL_USR_CLMN_SURNAME +" , " + TBL_USR_CLMN_CODE  +")" + "  VALUES('PAOLO2','ROSSI2', 103213 )");
        db.execSQL("INSERT INTO " + TBL_USR + " " + "("+ TBL_USR_CLMN_NAME  +" , " + TBL_USR_CLMN_SURNAME +" , " + TBL_USR_CLMN_CODE  +")" + "  VALUES('PAOLO3','ROSSI3', 5454331 )");
        db.execSQL("INSERT INTO " + TBL_USR + " " + "("+ TBL_USR_CLMN_NAME  +" , " + TBL_USR_CLMN_SURNAME +" , " + TBL_USR_CLMN_CODE  +")" + "  VALUES('PAOLO4','ROSSI4', 5454444 )");
        db.execSQL("INSERT INTO " + TBL_USR + " " + "("+ TBL_USR_CLMN_NAME  +" , " + TBL_USR_CLMN_SURNAME +" , " + TBL_USR_CLMN_CODE  +")" + "  VALUES('PAOLO5','ROSSI5', 1231232 )");
        db.execSQL("INSERT INTO " + TBL_USR + " " + "("+ TBL_USR_CLMN_NAME  +" , " + TBL_USR_CLMN_SURNAME +" , " + TBL_USR_CLMN_CODE  +")" + "  VALUES('PAOLO6','ROSSI6', 4443343 )");

    }
You can navigate on the data on the WebSQL entry.
And you can run queries on your db...(!)
Of course it is only a first glance at this tool but it is enough to check the power of this debug tool.
You can get code from GitHub:

You should be aware of the type of detox you require since this will determine if the detox you select is appropriate for the task at hand. The efficiency of the shampoos on the market varies. Some are designed to be used on the day of the test because they will only function for a few hours or an entire day at most, but others will have a longer-lasting effect if used regularly. Choose the detox shampoo that offers the most protection for your circumstance. In conclusion, we hope we were able to answer any questions you might have about how to pass a hair follicle drug test. While it can be tricky, it can also absolutely be done!. Visit: https://www.urineworld.com/
ReplyDeleteLot of Informative blog are provided here, Happy to read this good post.
ReplyDeletePlease keep us up to data like this. Thanks for sharing and Keep on writing
ReplyDeleteI appreciating this great blog. Thank you for posting something good like this
ReplyDeleteIt was definitely informative article you've done. This site is very useful. Thank you
ReplyDeleteVery descriptive post, I loved that bit. Will there be a part 2?
ReplyDeleteThis article is genuinely a nice one it helps new web users, who are wishing for blogging.
ReplyDeleteI am regular visitor, how are you everybody?
ReplyDeleteThis post posted at this web page is truly good.
ReplyDeleteWow, fantastic blog layout!
ReplyDeleteHello there! I'm really loving this piece of writing and the encouraging comments that have been left here.
ReplyDeleteLike!! I frequently blog, and I genuinely appreciate your content. My interest has been piqued by the article.
ReplyDeleteVery nice article and straight to the point. Keep it up, Thank you, so awesome!
ReplyDeleteThis is a great blog post, thanks for sharing. Really excited to read more desire more!
ReplyDeleteI really enjoyed your blog post. Really excited to read more. Amazingly cool!
ReplyDeleteI want to express my gratitude for the blog post. Really excited to read more. Great.
ReplyDeleteFantastic great post This is a great post, thanks for sharing it. Gratitude again. Awesome.
ReplyDeleteThis website was, how shall I put it? Relevant!! I've at last discovered something useful. Cheers!
ReplyDeleteI genuinely enjoy reading on this website , it has got great blog posts.
ReplyDeleteI’ve been exploring for a bit for any high quality articles or blog posts in this kind of area.
ReplyDeleteI appreciate your article. Really excited to read more. Many thanks.
ReplyDeleteExcellent post. Really excited to read more. Go on writing.
ReplyDeleteHello everyone! I truly enjoy visiting this website because it has helpful information.
ReplyDeleteThank you for sharing!
ReplyDeleteThanks again for a great article!
ReplyDeleteThis sort of clever work and reporting!
ReplyDeleteKeep up the superb works guys I've included you guys to my blogroll.
ReplyDeleteAmazing! This blog looks exactly like my old one!
ReplyDeleteThis type of clever blog work and coverage! Keep up the great works..-ag
ReplyDeleteThanks for another wonderful post.-ag
ReplyDeleteWow! Such an amazing and helpful post this is.-ag
ReplyDeleteThanks for sharing such a wonderful post.
ReplyDelete-ag
Very good written information.
ReplyDeleteThis is such a great resource that you are providing and you give it away for free.
ReplyDeleteThis is really impressive! thanks for share this awesome research!
ReplyDeleteI needed to see and read this post today and smile.
ReplyDeleteI hope they find each other. simply gorgeous work!
ReplyDeleteThis post is extra charming.
ReplyDeleteHelpful for me. I admire the valuable information you offer in your articles... MM
ReplyDeleteImpressive. Thanks for the inspiration! I really appreciate people like you!... MM
ReplyDeleteClever work and reporting! Keep up the amazing works guys, thankyou!!... MM
ReplyDeleteI truly feel this amazing site needs much more attention, thanks for the info!... MM
ReplyDeleteAwesome issues here. I'm very glad to look your article. Thanks a lot... MM
ReplyDeleteGood site you have here.. It's difficult to find quality writing like yours nowadays... MM
ReplyDeleteNice read, I just passed this onto a colleague who was doing a little research on that... MM
ReplyDeleteI thoroughly enjoyed reading your informative article. I look forward to more insightful content from you.
ReplyDeleteThis post is extra charming.
ReplyDeleteI just love this blog and this piece of art.
ReplyDeleteJust gorgeous and somehow nostalgic.
ReplyDeleteThere is something so peaceful and loving about your art.
ReplyDelete